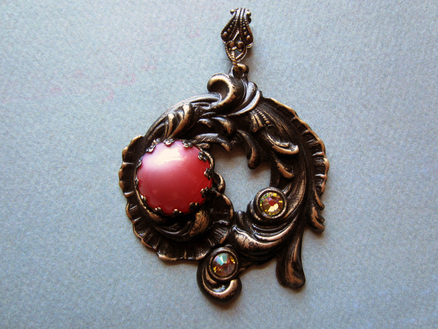
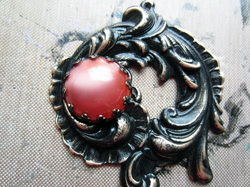
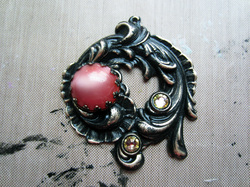
In this tutorial, I will be showing you step-by-step, how to create a blackened Victorian pendant (YAY!)
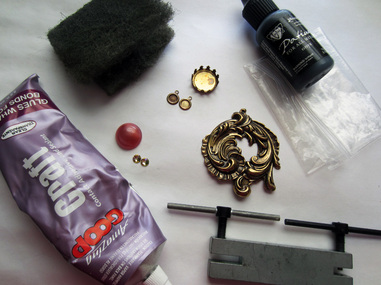
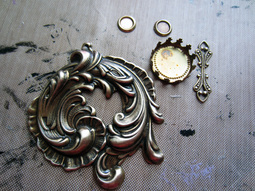
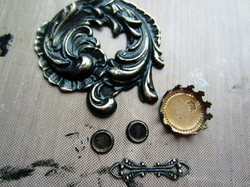
Here's what you will need:
-Victorian style decorative stamping (brass)
-A "focal" cabochon (I used a vintage glass cab that is 15mm round)
-Accent cabochons (OPTIONAL- but I like to add a little more to my pieces. I used 5mm Swarovski flat back rhinestones)
-Brass settings to hold your stones (I used a crown edge setting for my focal stone.)
-Brass connector that is pliable for creating a bail
-Vintaj Brass Co. Patina Ink in Onyx
-Paint brush and cup of water
-Jump ring or small chain link
-Metal hole punch (OPTIONAL-this is only required if your stamping doesn't already have a hole to attach a jumpring)
-Craft Goop adhesive
-Jewelry flat nose pliers
-Bail making pliers or jump ring maker mandrel
-Fine grit steel wool
-Jewelry file
-Protected work surface
-Small hobby storage bag (resealable)
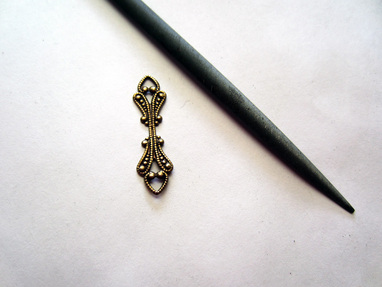
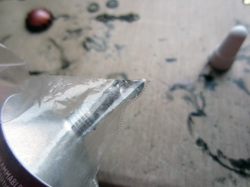
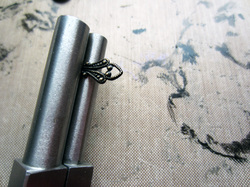
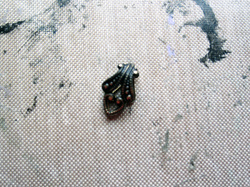
(Above) My brass connector that will be my bail and my jewelry file.
Step 1: Prep your brass
In order for the Patina ink to go on smoothly, you need to make sure your metal pieces are nice and clean. My brass stamping was antique plated, so I had to remove that plating using my steel wool.
If your piece is raw brass, it's best to wash with warm soapy water first to remove the oily residue from the manufacturing process.
Repeat this step for all of the brass components that you want blackened.
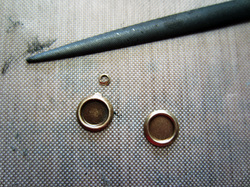
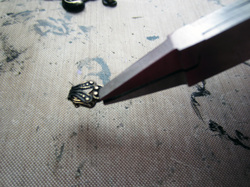
My settings for my accent stones had loops. I clipped them off with my flush cutter pliers, and using my jewelry file, I smoothed the egde.
When using the jewelry file, you only move forward, not back and forth. Make sure each run through has little force or pressure. Using your finger, make sure the edge feels smooth.
Step 2: Adding a Hole (Optional)
My stamping did not have a hole or loop for attaching a bail, so I had to make one! I decided the best way I wanted this to hang, since it was an asymmectrical design. Placing your stamping into your hole puncher, keep an eye on it and make sure that is even.
Punch the hole and check for sharp edges or nicks around the edge of the hole. You can use your jewelry file to smooth it out.
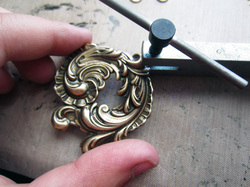
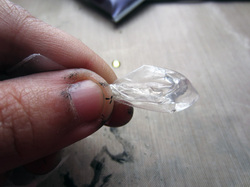
Step 3: Adding Your "Patina"
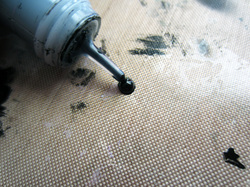
Shake the patina ink vigorously for a few seconds. Squeeze the paint out in small amounts on your protected work surface or even a ziplock bag would be fine, as it is quick drying and a little goes a long way.
Using your brush, begin coating your brass stamping as even as possible. Be sure to get the paint into all the indentions. If you wish, you may paint the back of the stamping as well once the top part has dried.
Tip: It's best to put your brush into the cup of water right after painting. The paint dries very fast and will make your brush "frozen" and pretty much unusable.
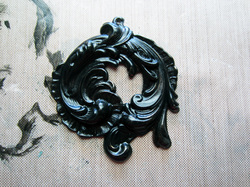
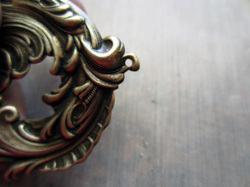
Now my stamping is fully coated black! Be sure to repeat this step for your settings and bail.
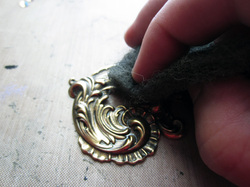
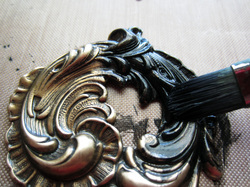
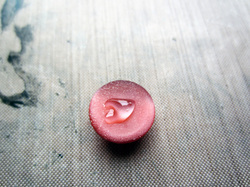
Step 4: Bringing out the Highlights
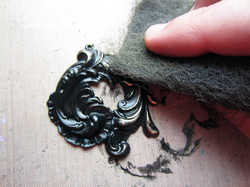
Using your fine grit steel wool, begin gently rubbing your blackened stamping to bring out the raised areas. It's up to you how much or how little highlight you have.
Note on steel wool: I use steel wool for this because I get a gentle result, where a sanding block will take off the paint too easy and the results will be harsh and unnatural. However, steel wool generates a fine dust, so you must clean your piece after by a quick water rinse or using a damp cloth. The water will not affect your paint so don't worry :)
Note on steel wool: I use steel wool for this because I get a gentle result, where a sanding block will take off the paint too easy and the results will be harsh and unnatural. However, steel wool generates a fine dust, so you must clean your piece after by a quick water rinse or using a damp cloth. The water will not affect your paint so don't worry :)
Repeat this step for all your blackened components.
Step 5: Glue control
We are going to create an "icing bag" for our glue to maintain control. I learned this tip from a video tutorial provided by Susan of Vintage Jewelry supplies Co.
Open your resealable bag and place your craft goop nozzle in a bottom corner. squeeze out as much glue as you're gonna use. Close the bag and press down to guide all the glue to the corner.
Twist the bag above your glue corner. You can use a twist tie or rubber band to secure it, but I just hold it with my fingers.
Snip the very most corner just a teeny bit. This will control how much glue comes out. Now we are ready to go!
Snip the very most corner just a teeny bit. This will control how much glue comes out. Now we are ready to go!
Step 6: Setting your stones
Apply your adhesive to the back of your stone. Don't overdo it, because it can seep out the sides of the setting and we don't want any glue showing!
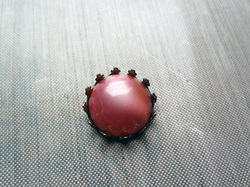
Place your stone in the setting and allow to dry. If your setting has prongs, you can use the grip end of your pliers to gently bend the prongs down without the paint chipping off.
For my accent stones, it was easier to apply the glue to the setting rather than the rhinestone.
Make sure there is no visible glue coming out! Make sure to give all your set stones time to dry!
Step 7: Placing Your Stones
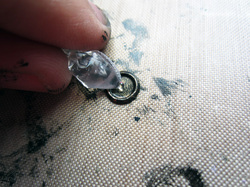
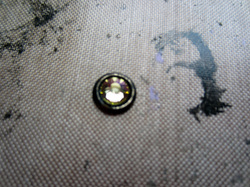
Now the fun stuff! Decide where you want your focal cabochon to go. Squeeze out enough craft goop to fill any spaces that will be between the stamping and the setting especially in a highly dimensional stamping. Don't put too much though! If you see some glue around the edges, you can pick it off using a toothpick or sewing needle.
I've placed my focal and cleaned up any excess glue.
Repeat this step for your accent stones :) Allow your piece to dry for 24 hours.
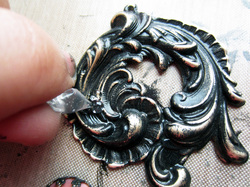
Step 8: Making The Bail
Place your connecter in the center of your bail pliers, or if your are using a mandrel, hold it in place with your thumb. Gently bend the sides down with your fingers.
Where the tow sides meet, gently clamp them together using your flat nose pliers.
Now you have a beautiful bail!
Step 9: Finishing Touches

Open your jumpring and attach your piece to your bail! You are done! Add a chain or ribbon and it's ready to wear! I hope this tutorial was informative. If you have any questions about it, no matter how small, just email me at [email protected]
 RSS Feed